
Setting up SMTP in WordPress with GoDaddy Professional Email without using any plugins is a simple process that requires adding specific email settings to the WordPress configuration file. This allows WordPress to send emails through the GoDaddy email servers directly.
By following a few steps, you can easily set up SMTP in WordPress with GoDaddy Professional Email without relying on any plugins. This method ensures that your emails are sent successfully without any interruptions. Let’s delve into the details on how to accomplish this.
Credit: wordpress.org
Setting Up Smtp In WordPress
Setting up SMTP (Simple Mail Transfer Protocol) in WordPress is a crucial step to ensure that your emails are delivered successfully to your recipients’ inboxes. While there are various plugins available to help you configure SMTP settings, you can also set it up manually without using any plugins. In this guide, we will walk you through the process of setting up SMTP in WordPress with GoDaddy Professional Email, allowing you to send emails smoothly and professionally.
Step 1: Accessing Godaddy Pro Email
In order to get started, you need to access your GoDaddy Pro Email account. Simply follow the steps below:
- Log in to your GoDaddy account by visiting www.godaddy.com.
- Navigate to the workspace email section by clicking on “Products” in the main menu and selecting “Email” from the dropdown.
- Under the workspace email section, locate the GoDaddy Pro Email account that you want to set up SMTP for and click on “Manage” next to it.
Step 2: Setting Up A Godaddy Pro Email Account
If you don’t have a GoDaddy Pro Email account yet, you can easily create one by following these steps:
- Log in to your GoDaddy account and navigate to the workspace email section as mentioned in step 1.
- Click on “Add” in the top right corner and select “Email” from the dropdown.
- Fill in the required details, including the email address and password for your new GoDaddy Pro Email account.
- Click on “Create” to finish creating your GoDaddy Pro Email account.
Without Plugin Method
Step 3: Configuring Smtp Settings In WordPress (Without Plugin)
Configuring SMTP (Simple Mail Transfer Protocol) for WordPress to use GoDaddy’s Professional Email without a plugin involves modifying the WordPress core files. Here’s a step-by-step guide to set up SMTP in WordPress with GoDaddy Professional Email:
Step 3.1: Collect GoDaddy Email Details
You’ll need the following information:
- SMTP Host: This will usually be
smtpout.secureserver.netfor GoDaddy. - SMTP Port: Typically, port
465with SSL encryption, or587with TLS encryption. - Username: Your full GoDaddy email address.
- Password: Your GoDaddy email account password.
Step 3.2: Access WordPress Files
Access your WordPress installation files either through an FTP client or the file manager in your hosting control panel.
Step 3.3: Locate wp-config.php File
Find the wp-config.php file in your WordPress root directory. This file contains essential configuration settings for your WordPress site.
Step 3.4: Add SMTP Configuration
Add the following code snippet before the line that says /* That's all, stop editing! Happy publishing. */.
// SMTP settings for GoDaddy Email
define( 'WPMS_ON', true );
define( 'WPMS_SMTP_PASS', 'your_email_password' );
define( 'WPMS_SMTP_HOST', 'smtpout.secureserver.net' );
define( 'WPMS_SMTP_PORT', 465 ); // Change this to 587 if needed
define( 'WPMS_SSL', 'ssl' ); // Change to 'tls' if needed
define( 'WPMS_SMTP_AUTH', true );
define( 'WPMS_SMTP_USERNAME', 'your_full_email_address' );
Replace 'your_email_password' and 'your_full_email_address' with your GoDaddy email password and full email address, respectively.
Step 3.5: Save Changes
After adding the code, save the wp-config.php file and upload it back to your server if you made changes locally.
Step 3.6: Test Email Functionality
To test if the setup is working, you can try various actions that trigger emails in WordPress, like password resets, new user registrations, or using a plugin to send a test email.
Remember, modifying core files like wp-config.php carries risks. It’s a good idea to create a backup before making any changes. Also, these settings might need adjustment based on GoDaddy’s specific requirements or any updates they make to their email service.
Lastly, consider the security aspect, as storing email credentials directly in the wp-config.php file could pose a risk. Always use strong, unique passwords and consider other security measures to protect your WordPress site.
With Plugin Method
Configuring Smtp Settings In WordPress (With Plugin)
Once you have accessed or created your GoDaddy Pro Email account, the next step is to configure the SMTP settings in WordPress. Follow these steps:
- Login to your WordPress dashboard.
- Go to the “Settings” menu and select “WP Mail SMTP” to access the configuration settings.
- Under the “General” tab, configure the following fields:
- From Email: Enter the email address associated with your GoDaddy Pro Email account.
- From Name: Enter the name you want to appear as the sender of the emails.
- Mailer: Select “Other SMTP” from the dropdown.
- Scroll down to the “Other SMTP” section and enter the following SMTP details for GoDaddy Pro Email:
SMTP Host: smtpout.secureserver.net Encryption: Use SSL/TLS SMTP Port: 465 SMTP Authentication: Yes Username: Enter your GoDaddy Pro Email address Password: Enter the password for your GoDaddy Pro Email account - Click on the “Save Settings” button to save your SMTP configuration.
That’s it! You have successfully set up SMTP in WordPress using GoDaddy Professional Email without the need for any plugins. Now, you can send emails from your WordPress website using your GoDaddy Pro Email account with ease. Make sure to test your email functionality to ensure that everything is working as expected.
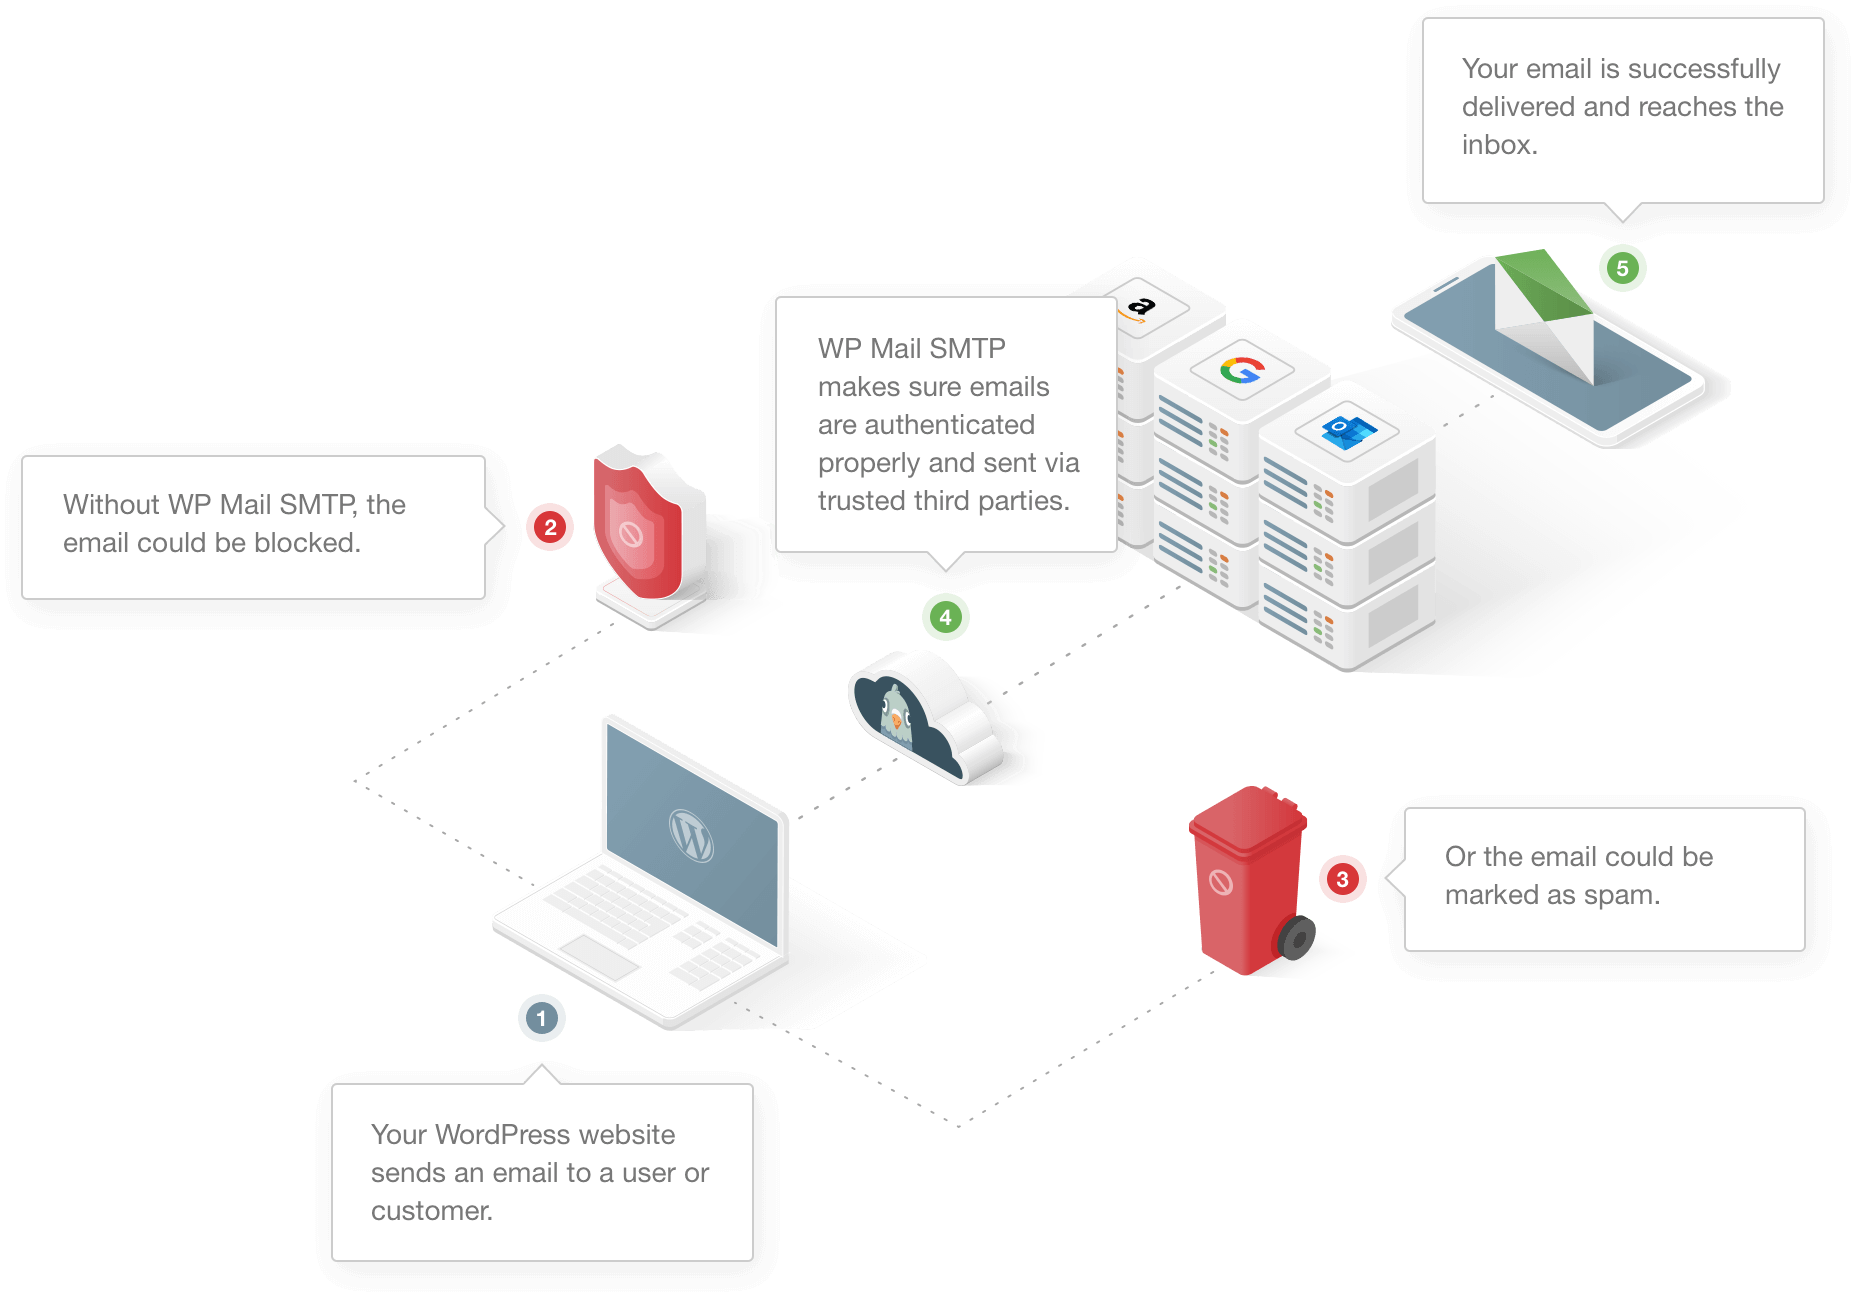
Credit: wpmailsmtp.com
Testing And Troubleshooting
Once you have set up SMTP in WordPress with GoDaddy Professional Email, it’s important to test the setup to ensure everything is working smoothly. In this section, we will go through the process of testing and troubleshooting any common issues that may arise.
Testing The Smtp Setup
After configuring the SMTP settings in WordPress, it is crucial to verify that the setup is functioning correctly. To do this, follow these steps:
- Go to the WordPress dashboard and navigate to the ‘Settings’ menu.
- Select ‘Email’ from the submenu.
- Scroll down to the ‘SMTP’ section and enter a valid email address in the ‘Test Email’ field.
- Click on the ‘Send Test Email’ button.
- The system will then send a test email to the specified email address.
- Check the email account to confirm if you have received the test email.
- If the test email is successfully delivered to your email account, it means the SMTP setup is working correctly.
By performing this test, you can ensure that your SMTP configuration is properly handling outgoing emails from your WordPress website.
Common Issues And How To Troubleshoot Them
While setting up SMTP in WordPress, you may encounter some common issues. Here are a few troubleshooting techniques to help you resolve them:
| Issue | Troubleshooting Steps |
|---|---|
| Emails not being sent |
|
| Emails being marked as spam |
|
| SMTP authentication failure |
|
By following these troubleshooting steps, you can resolve common issues that may arise while setting up and using SMTP in WordPress with GoDaddy Professional Email. Remember to double-check your settings, test the functionality, and stay aware of any specific requirements or limitations imposed by your email provider.

Credit: wpmailsmtp.com
Frequently Asked Questions On How To Set Up Smtp In WordPress With Godaddy Professional Email Without Using Any Plugins
How To Use Smtp In WordPress Without Plugin?
To use SMTP in WordPress without a plugin: 1. Access your WordPress dashboard. 2. Go to the “Settings” menu and click on “Email. ” 3. Fill in the SMTP server details provided by your hosting provider or email service. 4. Enter the email address you want to use as the sender.
5. Save the changes and test your email functionality.
How Do I Enable Smtp On Godaddy Email?
To enable SMTP on GoDaddy email, follow these steps: 1. Log in to your GoDaddy account. 2. Go to the Workspace Control Center. 3. Select the email address you want to enable SMTP for. 4. Click on “Settings” and then “Server Settings”.
5. Scroll down to the “SMTP” section and switch it on. That’s it! You have successfully enabled SMTP on your GoDaddy email.
How Do I Configure WordPress To Send Emails Using Smtp?
To configure WordPress to use SMTP for sending emails, follow these steps: 1. Install and activate the “Easy WP SMTP” plugin. 2. Go to the plugin’s settings page and enter the SMTP server details provided by your email service provider. 3.
Save the settings and test the connection to ensure it’s working properly. 4. Update the “From Email” and “From Name” fields with the desired email address and name. 5. Save the changes and WordPress will now use SMTP for sending emails.
Does Godaddy Block Smtp?
Yes, GoDaddy does block SMTP.
Conclusion
Setting up SMTP in WordPress with GoDaddy Professional Email without using any plugins can be a simple and effective solution for enhancing the delivery of your emails. By following the step-by-step guide provided in this blog post, you can easily configure your SMTP settings and improve the reliability and security of your outgoing emails.
With a few easy tweaks, you can ensure that your WordPress website seamlessly integrates with your GoDaddy Professional Email, providing a smoother communication experience for you and your audience. Take control of your email delivery today and optimize your website’s performance.