Our WordPress Media Library Solutions can help you resolve image upload problems in a hassle-free manner. When you encounter issues with uploading images to your WordPress media library, it can be frustrating.
Let us introduce you to effective solutions that address these problems and ensure smooth image uploads. With our expert guidance, you can optimize your media library, resolve any technical glitches, and enhance the overall performance of your website. Don’t let image upload problems slow you down – find the solutions you need today.

Common Issues With Image Upload In WordPress Media Library
Are you facing issues when uploading images to your WordPress Media Library? Don’t worry, you’re not alone. Many WordPress users encounter common problems when it comes to uploading images. In this post, we’ll explore the most frequent issues and provide solutions for each one, so you can have a smooth experience while managing your media library.
File Size Limitations
One common issue users face when uploading images to the WordPress Media Library is file size limitations. WordPress has a default maximum file size limit set for image uploads, which can be a problem if your images exceed that limit. Trying to upload large files may result in errors or failures.
To overcome this limitation, there are a few steps you can take:
- Optimize your images: Reduce the file size of your images using image optimization tools or plugins. This will help maintain the quality of your images while reducing the overall file size.
- Change the maximum file size limit: If you have access to your server’s configuration files, you can increase the maximum file size limit by adjusting the
upload_max_filesizeandpost_max_sizevalues. Consult your hosting provider or a developer for assistance with this. - Upload images via FTP: If your images are too large to upload through the WordPress Media Library, you can use FTP to transfer them directly to your server. Then, you can manually add them to your media library using the “Add New” option.
Here’s a comprehensive guide on how to increase the upload_max_filesize in WordPress using different methods including .htaccess editing, PHP settings adjustment through cPanel, and database modification via phpMyAdmin:
Method 1: Update .htaccess File
Access cPanel: Log in to your cPanel account.
File Manager: Navigate to “File Manager” or any file browsing option available.
Find WordPress Root Directory: Locate your WordPress files (usually in
public_htmlor a subdirectory).Edit
.htaccessFile: Right-click on.htaccessand select “Edit”.Add or Modify Lines:
php_value upload_max_filesize 32Mphp_value post_max_size 32MReplace
32Mwith your desired file size limit.Save Changes: Save the file.


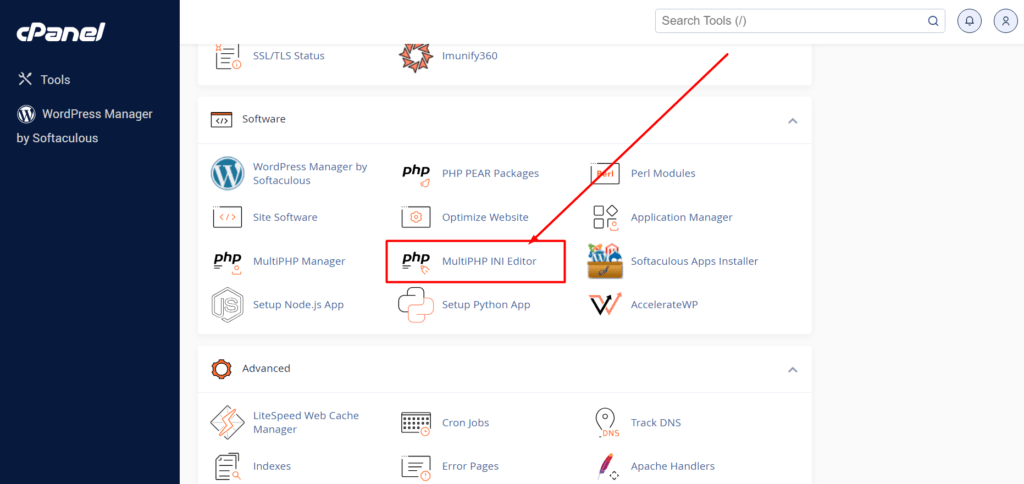
Method 2: Adjust PHP Settings via cPanel
- Login to cPanel: Access your cPanel account.
- Select PHP Version: Find “Select PHP Version” or “MultiPHP INI Editor” or a similar option.
- Switch to PHP Options: Look for “Switch to PHP Options” or a similar setting.
- Modify Values:
- Find
upload_max_filesizeandpost_max_size. - Update both to your desired size (e.g.,
32M).
- Find
- Save Changes: Click “Save” or “Apply”.

Watch This Video For in Depth Solution
Method 3: Update Database via phpMyAdmin
- Access phpMyAdmin: Log in to cPanel and open phpMyAdmin.
- Select WordPress Database: Choose your WordPress database.
- Locate
wp_optionsTable. - Find
upload_max_filesizeandpost_max_sizeOptions. - Edit Values:
- Click “Edit” for each option.
- Modify
option_valueto your desired size.
- Save Changes.
Verification Steps
- Check WordPress Dashboard:
- Navigate to “Media” -> “Add New” in the WordPress dashboard.
- Confirm the updated maximum upload size reflects the changes made.
Always remember to back up your files and database before making any changes. If uncertain, seek guidance from your hosting provider’s support team or a developer to avoid potential issues with your WordPress site.
Image Format Compatibility
Another common issue is image format compatibility. While WordPress supports a wide range of image formats, some formats may not be compatible, especially if they are outdated or uncommon. Attempting to upload these unsupported formats can lead to errors or unexpected behavior.
To ensure compatibility, consider the following tips:
- Use common image formats: Stick to popular and widely-accepted formats like JPEG, PNG, and GIF. These formats are well-supported across platforms, browsers, and devices.
- Convert unsupported formats: If you have images in unsupported formats, consider converting them to a compatible format using image editing software or online converters.
- Update WordPress and plugins: Keeping your WordPress installation and plugins up to date can help ensure compatibility with the latest image formats.
Upload Errors
Upload errors can be frustrating, but they are a common occurrence when working with the WordPress Media Library. These errors can be caused by various factors, such as server configuration issues, file permissions, or conflicts with plugins or themes.
To troubleshoot upload errors, try the following:
- Check file permissions: Ensure that the directory where your WordPress installation is located has the correct file permissions. The recommended permissions for folders are typically 755, and for files, they are 644.
- Deactivate plugins and switch to a default theme: In some cases, conflicts between plugins or themes can cause upload errors. Temporarily deactivate your plugins and switch to a default WordPress theme to rule out any conflicts.
- Contact your hosting provider: If you’ve tried the above steps and are still experiencing upload errors, it’s best to reach out to your hosting provider for further assistance. They can help verify server configurations and troubleshoot any server-related issues.
By addressing these common issues, you can streamline the image upload process in your WordPress Media Library, ensuring your website remains visually appealing and engaging for your visitors.
Effective Solutions For Image Upload Problems
Are you facing image upload problems on your WordPress website? Don’t worry, we’ve got you covered with our effective solutions. In this article, we will discuss three key solutions to tackle image upload problems and enhance the functionality of your WordPress Media Library. Whether you need to optimize image file sizes, convert image formats, or troubleshoot upload errors, we have the answers you need. Take a look below at the three solutions that will help streamline your image uploading process.
Optimizing Image File Size
One common issue faced by website owners is slow loading times due to large image file sizes. Optimizing image file size not only helps improve website performance but also saves server space, ensuring faster loading times for your visitors. To optimize your images, you can follow these steps:
- Choose the appropriate image dimensions for your website design. Avoid using unnecessarily large images that will only slow down your website.
- Use image compression tools to reduce the file size without compromising image quality. There are various online tools like TinyPNG and Compress JPEG that can help you achieve this.
- Consider using lazy loading techniques to load images only when they are in the viewport, reducing the initial load time of your webpage.
Using A WordPress Plugin For Format Conversion
Another common issue arises when you need to convert images to different formats that are compatible with your website. WordPress offers a variety of plugins that can make format conversion a breeze. One such plugin is Imagify. This plugin not only optimizes image file sizes but also allows you to convert images to the optimal format for your website. With just a few clicks, you can convert your images to formats like JPEG, PNG, or WebP, ensuring compatibility and faster loading times.
Troubleshooting Upload Errors
Encountering upload errors can be frustrating, but with the right troubleshooting techniques, you can quickly overcome them. Here are some steps to follow when troubleshooting upload errors:
- Check your file permissions. Ensure that the folder where you are uploading your images has the correct permissions set. Typically, folders should have 755 permissions, while files should have 644 permissions.
- Disable any conflicting plugins or themes. Sometimes, certain plugins or themes can interfere with the image uploading process. By deactivating them temporarily, you can identify if they are causing the issue.
- Verify your server’s maximum upload file size. Ensure that the size limit set by your server is not too low for the images you are trying to upload. You can adjust this limit by modifying the
php.inifile or contacting your hosting provider for assistance.
By following these troubleshooting steps, you can resolve most upload errors and enjoy a smooth image uploading experience on your WordPress website.
Now that you are equipped with these effective solutions, you can overcome image upload problems with ease. Remember to optimize your image file sizes, utilize WordPress plugins for format conversion, and troubleshoot any upload errors diligently. Enjoy a seamless image uploading process and enhance the overall performance of your website’s media library.
Improving WordPress Media Library Functionality
Having trouble with image uploads in your WordPress Media Library? Our solutions can help improve functionality and resolve any issues you may be experiencing. Boost your website’s efficiency with our WordPress Media Library solutions.
Improving WordPress Media Library Functionality The WordPress media library is a crucial component for managing and organizing the images used on your website. However, it’s not uncommon to encounter issues with image uploads that can hinder the smooth functioning of your media library. In this blog post, we will explore some solutions to these image upload problems and how they can help improve the overall functionality of your WordPress media library.
Organizing Images With Folders
One of the challenges of managing a large number of images in the media library is keeping them organized. Without proper organization, it becomes difficult to locate specific images when you need them. Fortunately, there are ways to simplify this process by using folders. By organizing your images into folders, you can create a logical structure that makes it easier to navigate and find the right image quickly. To implement this solution, you can use a plugin like “Media Library Folders” or “Enhanced Media Library.” These plugins extend the default functionality of the WordPress media library by allowing you to create folders and subfolders. They also provide an intuitive interface that makes it easy to drag and drop images into the desired folders. With this improved organization, you can reduce the time spent searching for specific images and maintain a tidy media library.
Utilizing Image Compression Tools
Large image file sizes can slow down your website’s loading time, affecting user experience and search engine rankings. To address this issue, it’s essential to optimize your images by compressing their file sizes without compromising their quality. This can be achieved using various image compression tools available online. One such tool is “Smush,” a popular WordPress plugin that automatically compresses and optimizes your images during the upload process. It reduces the file size significantly without affecting the visual quality. Additionally, it also has a bulk smush feature that allows you to compress multiple images at once. By utilizing image compression tools like “Smush,” you can enhance the performance of your website and ensure faster loading times.
Implementing Cdn Integration
Content Delivery Networks (CDNs) are external servers that cache and deliver your website’s static files, including images, to users based on their geographical location. By offloading image delivery to a CDN, you can reduce the load on your web server and provide faster access to your images. Integrating a CDN with your WordPress media library is a straightforward process. Many CDN providers offer plugins that seamlessly integrate with your website. For example, “WP Rocket” is a popular caching plugin that includes built-in CDN integration. All you need to do is sign up for a CDN service, obtain an API key, and enter the required settings in the plugin’s configuration. Once integrated, your images will be delivered through the CDN network, resulting in improved loading times and a smoother user experience. In conclusion, enhancing the functionality of your WordPress media library is crucial for efficient image management. By organizing images with folders, utilizing image compression tools, and implementing CDN integration, you can overcome image upload problems and optimize your website’s performance. Implementing these solutions will not only save time and effort but also enhance the overall user experience of your website.
Frequently Asked Questions On Image Upload Problems? Our WordPress Media Library Solutions
Why Can’t I Upload Images To My WordPress Media Library?
There can be several reasons for image upload problems in WordPress. Check the file type and size, ensure proper file permissions, and disable any conflicting plugins or themes. Additionally, check if your hosting provider has any upload restrictions or limitations in place.
How Can I Fix The “http Error” When Uploading Images To WordPress Media Library?
To fix the “HTTP error” when uploading images, try these troubleshooting steps: increase PHP memory limit, disable mod_security, check file permissions, and configure your server to allow larger uploads. You can also try uploading the image in a different format or size.
What Should I Do If My WordPress Media Library Is Not Displaying Images?
If your WordPress media library is not displaying images, check if the image files are properly uploaded to the server. Clear your browser cache and try accessing the media library again. Additionally, disable any conflicting plugins or themes that might be causing the issue.
Conclusion
Our WordPress Media Library Solutions offer effective ways to overcome image upload problems. With user-friendly features and seamless integration, you can say goodbye to frustration and hello to a smooth uploading experience. Optimize your website’s media management and ensure your images are easily accessible and visually appealing to your audience.
Experience the benefits of our solutions and take your WordPress media library to the next level.