Introduction
Facing Blurry Image Problem? In the dynamic digital landscape of WordPress, the visual appeal of your website is paramount. Images play a pivotal role in capturing the audience’s attention and conveying information effectively. However, maintaining optimal image quality can be a challenging endeavor, often leading to the frustrating issue of blurry images.
Importance of Image Quality in WordPress
The visual aesthetics of a WordPress website significantly impact user experience and engagement. High-quality images contribute to a professional and visually appealing site, fostering a positive impression among visitors. Whether you are showcasing products, sharing content, or establishing an online presence, the clarity and sharpness of images directly influence the perceived credibility and professionalism of your site.
In addition to the user experience, search engines consider image quality as a ranking factor. Well-optimized and clear images enhance the overall SEO performance of your WordPress site, potentially leading to higher visibility and increased traffic.
Common Challenges with Blurry Images
Despite the inherent significance of image quality, website owners often encounter the vexing issue of blurry images. Understanding the root causes of this problem is crucial for effective troubleshooting. Common challenges include issues related to image compression, incorrect dimensions, and compatibility problems with themes and plugins.
Unoptimized image compression settings can result in loss of detail, leading to blurry visuals. Similarly, uploading images with incorrect dimensions that don’t align with the theme’s specifications can distort the display. Compatibility issues with themes and plugins may also impact the rendering of images, causing blurriness and hindering the overall visual appeal of the website.
Addressing these challenges is essential to ensure that your WordPress site delivers a visually stunning and compelling experience for your audience. In the subsequent sections, we will delve into the causes of blurry images and provide actionable solutions to rectify this common issue effectively.
Understanding the Causes
Ensuring crystal-clear images on your WordPress website involves a comprehensive understanding of the underlying causes that lead to the issue of blurry visuals. Identifying these causes is pivotal in implementing targeted solutions for a seamless and visually appealing online presence.
Image Compression Issues
One of the primary culprits behind blurry images in WordPress is improper image compression. While compression is essential for optimizing website performance by reducing file sizes, overly aggressive compression can compromise image quality. This can result in artifacts, loss of detail, and ultimately, a blurry appearance.
To address this, it’s crucial to strike a balance between file size reduction and image clarity. Choosing the right compression settings and utilizing tools that allow for fine-tuned control over the compression process can significantly mitigate the risk of distorted or blurry images.
Incorrect Image Dimensions
Another common contributor to blurry images is uploading pictures with incorrect dimensions. WordPress themes often have specific image size requirements for different sections of the site. Uploading images that do not match these dimensions can lead to distortion, pixelation, and an overall reduction in image quality.
- Featured Images with Mismatched Dimensions:
- Scenario: Your WordPress theme recommends a specific aspect ratio for featured images on blog posts, but you upload images with different dimensions.
- Example: The theme suggests a 16:9 aspect ratio for featured images, but you upload images that are square (1:1). As a result, the theme may automatically crop or stretch the images to fit, leading to distortion and a loss of image quality.
- Thumbnail Sizes Not Aligned with Theme Specifications:
- Scenario: The theme’s homepage grid or category pages expect thumbnail images of a particular size, but your media library contains thumbnails with inconsistent dimensions.
- Example: The theme requires square thumbnails (200×200 pixels), but some images have dimensions of 150×200 pixels. This discrepancy can disrupt the grid layout, causing misalignments and visual irregularities.
- Header Images with Unmatched Aspect Ratios:
- Scenario: Your WordPress theme has a header or banner section that displays a large image, but you upload header images without considering the recommended aspect ratio.
- Example: The theme suggests a 4:1 aspect ratio for the header image, but you upload an image with a 16:9 aspect ratio. The header may appear stretched or compressed, resulting in a distorted and visually unpleasing display.
- Slider Images Without Consistent Dimensions:
- Scenario: Your WordPress site features a slider or carousel that cycles through images, but the images have varied dimensions.
- Example: The slider is designed for images with a width of 1200 pixels, but you upload images with different widths, such as 800 pixels and 1600 pixels. As a result, the slider may struggle to maintain a cohesive appearance, leading to visual inconsistencies and potential blurriness during transitions.
To tackle this issue, it’s essential to be aware of the recommended image sizes for various sections of your WordPress theme. Resizing images before uploading them ensures that they align with the theme’s specifications, preventing the occurrence of blurry images due to incompatible dimensions.
Theme and Plugin Compatibility
The diverse landscape of WordPress themes and plugins introduces the potential for compatibility issues that can impact image rendering. Themes and plugins may not always seamlessly integrate with one another, leading to conflicts that manifest as blurry images. This could be a result of coding conflicts, outdated software, or incompatible functionalities.
To address theme and plugin compatibility challenges, regular updates and thorough testing are imperative. Ensuring that all components are in harmony will contribute to a smoother image display, eliminating the risk of blurriness caused by conflicts within the WordPress ecosystem.
In the subsequent sections, we will delve into diagnostic steps and practical solutions to effectively address these causes and restore optimal image quality to your WordPress site.
Diagnostic Steps
Once you’ve identified the potential causes of blurry images in your WordPress site, the next crucial phase involves diagnostic steps to pinpoint the specific issues and pave the way for effective solutions. The following steps provide a systematic approach to diagnosing and resolving image quality issues.
Image Inspection Tools
Utilizing specialized image inspection tools is a fundamental step in diagnosing the root causes of blurry images. These tools enable you to delve into the details of image properties, such as resolution, file format, and compression levels. By understanding the characteristics of your images, you can identify anomalies that may be contributing to the blurriness.
Popular image inspection tools include online platforms and WordPress plugins designed to analyze and display comprehensive information about your images. These tools empower you to assess the current state of your image files, helping you make informed decisions about necessary adjustments.
Testing Image Compression Settings
Since image compression is a common culprit behind blurry visuals, it is essential to meticulously test and adjust compression settings. Experiment with different compression levels to strike a balance between file size reduction and image quality preservation.
WordPress often provides native settings for image compression, and additional plugins can offer more control over this process. Through systematic testing, you can identify the optimal compression settings that maintain image clarity while ensuring your site remains responsive and fast-loading.
Theme and Plugin Analysis
Conducting a thorough analysis of your WordPress theme and plugins is critical to uncovering compatibility issues that may affect image quality. Start by checking for updates to ensure that you are running the latest versions of both your theme and plugins. Outdated software can contribute to conflicts and impact image rendering.
If issues persist, consider temporarily deactivating plugins or switching to a default WordPress theme to identify whether conflicts arise from specific elements. This step-by-step analysis allows you to isolate problematic components and take targeted measures to enhance compatibility, ultimately resolving any blurry image issues stemming from theme or plugin conflicts.
By systematically employing these diagnostic steps, you can gain valuable insights into the specific challenges affecting your WordPress images and lay the groundwork for implementing precise solutions in the subsequent sections.
Practical Solutions
Having diagnosed the root causes of blurry images in your WordPress site, it’s time to implement practical solutions to rectify the issues and restore optimal image quality. The following steps outline actionable measures to address image dimensions, compression, and theme/plugin optimization.
Adjusting Image Dimensions
- Recommended Image Sizes: Determine the recommended image sizes for different sections of your WordPress theme. This information is often available in theme documentation or settings. Understanding these specifications ensures that you upload images with dimensions compatible with your website layout, minimizing the risk of distortion or blurriness.
- Resizing Images in WordPress: Utilize WordPress’s built-in image resizing features or image editing tools to adjust the dimensions of your images. This step ensures that each image aligns perfectly with your theme’s requirements, maintaining clarity and preventing issues related to incorrect dimensions.
Optimizing Compression
- Choosing the Right Compression Settings: Fine-tune compression settings to strike a balance between reducing file size and preserving image quality. Experiment with compression levels, considering the content and purpose of each image. Aim for a configuration that minimizes blurriness while optimizing website loading times.
- Utilizing Image Compression Plugins: Explore and implement reputable image compression plugins available for WordPress. These plugins often offer advanced features, such as bulk optimization and automatic compression, streamlining the process and ensuring consistent image quality throughout your website.
Theme and Plugin Optimization
- Ensuring Compatibility: Verify that your WordPress theme and plugins are fully compatible with each other. Check for updates and ensure that all components are designed to work seamlessly together. Compatibility issues can lead to image distortion, so resolving these discrepancies is crucial for maintaining clarity.
- Updating and Troubleshooting: Regularly update your WordPress theme and plugins to access the latest features and bug fixes. If blurry images persist, systematically deactivate plugins or switch to a default theme to identify potential conflicts. Troubleshoot and address any compatibility issues that arise, ensuring a harmonious functioning of all elements within your WordPress ecosystem.
Advanced Techniques
In the pursuit of optimizing image delivery and enhancing overall performance, advanced techniques play a crucial role. Explore the following advanced strategies to not only address blurry image issues but also elevate the efficiency of your WordPress site.
Implementing Lazy Loading
Lazy loading is an advanced technique that defers the loading of images until they are about to come into the user’s viewport. This approach can significantly improve page load times, especially for sites with a substantial amount of images.
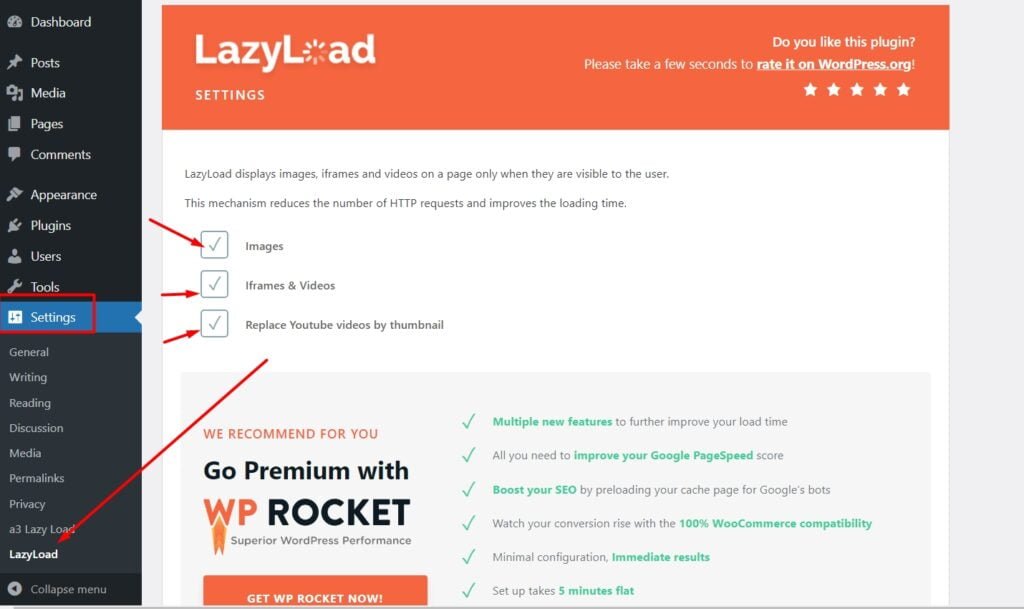
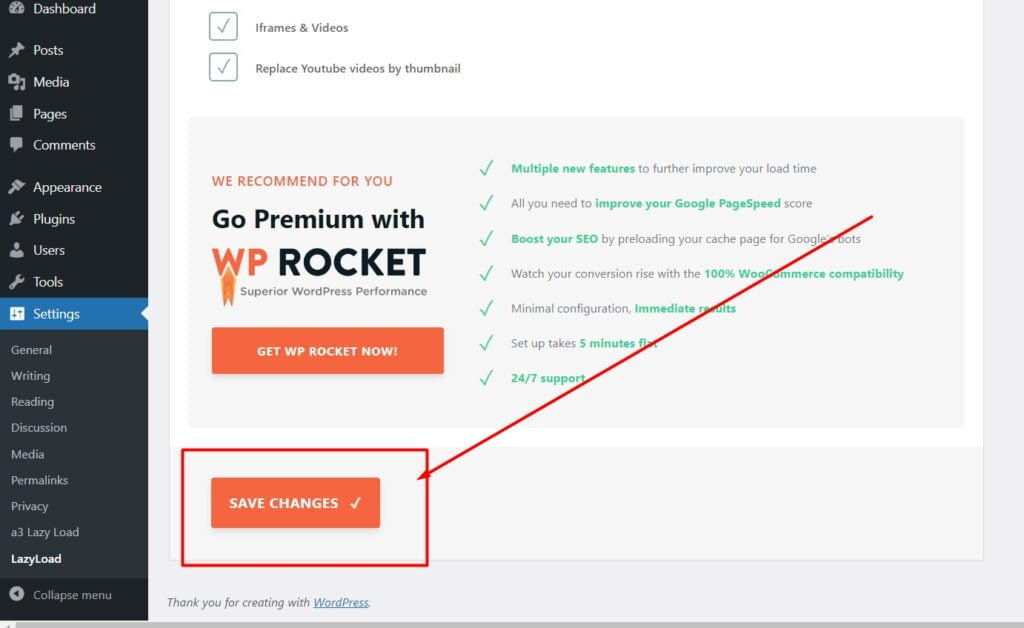
- Enabling Lazy Loading: Activate lazy loading for images in WordPress by leveraging built-in browser support or using plugins that facilitate lazy loading. Many modern browsers automatically support lazy loading, but plugins like “Lazy Load by WP Rocket” or “a3 Lazy Load” can provide additional features and customization options.
Best lazy load settings for Lazy Load by WP Rocket Plugin to prevent WordPress blurry image problem
Watch our video on Lazy Load by WP Rocket Plugin Setting
Best lazy load settings for A3 lazy Load Plugin to prevent WordPress blurry image problem
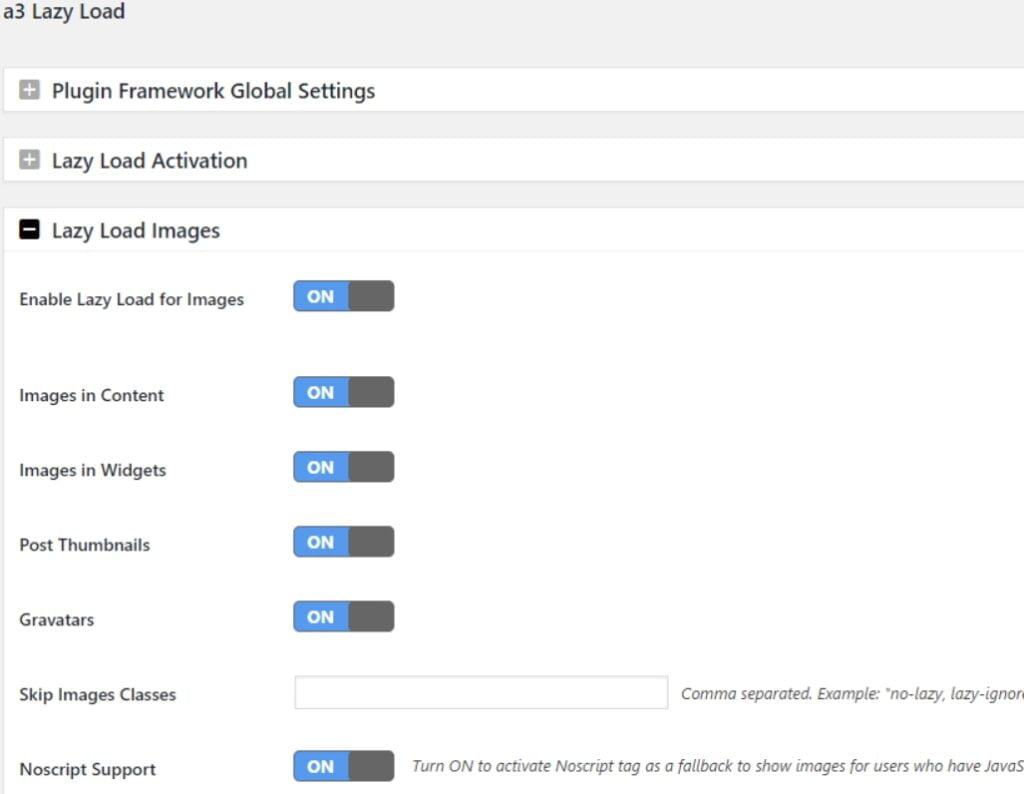

Watch our video on a3 Lazy Load Plugin Setting
- Fine-Tuning Settings: Adjust the lazy loading settings to cater to your site’s specific requirements. Consider factors such as the threshold at which images start loading and whether to include or exclude certain types of images. This fine-tuning ensures an optimal balance between performance improvement and user experience.
Using Content Delivery Networks (CDNs)
Content Delivery Networks are distributed networks of servers strategically positioned around the globe. By leveraging CDNs, you can enhance the speed and reliability of content delivery, including images, to users worldwide.
- Selecting a CDN Provider: Choose a reputable CDN provider that aligns with your site’s needs. Popular options include Cloudflare, Akamai, and Amazon CloudFront. Evaluate factors such as network coverage, ease of integration with WordPress, and any additional features offered.
- Integrating with WordPress: Integrate the chosen CDN with your WordPress site to offload the delivery of static content, including images. Most CDN providers offer plugins or integration guides for seamless implementation. Ensure that images are configured to be served through the CDN to benefit from improved load times.
- Optimizing CDN Settings: Fine-tune CDN settings to maximize performance. This may include configuring caching rules, adjusting security features, and optimizing image delivery settings. Regularly monitor CDN performance and make adjustments as needed to ensure consistent improvements in image loading speed.
By implementing these advanced techniques, you not only address blurry image issues but also bolster the overall performance and responsiveness of your WordPress site. Lazy loading and CDN integration contribute to a smoother user experience, making your site more accessible and visually engaging for a diverse audience.
PHP Coding Techniques to Prevent Blurry Images
To prevent blurry images in WordPress using PHP code, you can focus on optimizing image quality during the upload and display processes. Here are some PHP coding techniques to help you achieve this:
1. Adjusting Image Compression Settings:
Adjusting the compression settings during image upload can prevent excessive compression, which may lead to blurriness. Use the jpeg_quality filter to set the JPEG compression quality. Add the following code to your theme’s functions.php file:
function custom_image_quality($quality)  {
    return 100; // Set the desired quality (0 to 100) } add_filter('jpeg_quality', 'custom_image_quality');
2. Resizing Images:
Resize images to match the recommended dimensions for your theme. You can use the add_image_size function to define custom image sizes. Add the following code to your functions.php file:
add_image_size('custom-thumbnail', 150, 150, true);
Replace ‘custom-thumbnail’ with your preferred size identifier and adjust the dimensions accordingly.
3. Disabling Image Compression:
Disable WordPress’s default image compression using the jpeg_quality filter. This can be beneficial if you prefer to handle image compression externally. Add the following code to your functions.php file:
function disable_image_compression() {
    return 100; // Set the quality to 100 for no compression
}
add_filter('jpeg_quality', 'disable_image_compression');
4. Disable Image Resizing:
Prevent WordPress from generating multiple image sizes by default. Add the following code to your functions.php file:
function disable_default_image_sizes($sizes) {
    unset($sizes['medium']);
    unset($sizes['large']);
    return $sizes;
}
add_filter('intermediate_image_sizes_advanced', 'disable_default_image_sizes');
5. Serve High-Quality Images:
Ensure that the images served by WordPress retain their quality. This can be achieved by adjusting the image tag attributes. Modify the following code in your theme files:
echo wp_get_attachment_image($attachment_id, 'full', false, array('class' => 'custom-image-class'));
Replace ‘custom-image-class’ with your preferred CSS class.
Important Notes:
- Always create a backup of your theme’s files before making changes.
- Ensure that your server has sufficient resources to handle high-quality images.
- Regularly test your website’s performance and adjust settings as needed.
Implementing these PHP coding techniques allows you to have more control over image quality in WordPress, preventing common issues like blurriness caused by compression or resizing.
Prevention Tips
Proactively maintaining the health and quality of your WordPress website involves implementing preventive measures. Explore the following tips to prevent potential issues, including blurry images, and ensure the ongoing optimization of your site.
Regularly Update Themes and Plugins
- Stay Informed about Updates: Keep a vigilant eye on updates released for your WordPress theme and plugins. Developers often release updates to address bugs, enhance features, and improve compatibility. Regularly checking for updates ensures that your site benefits from the latest improvements.
- Scheduled Updates: Establish a routine for updating themes and plugins. Set aside dedicated time intervals, whether weekly or monthly, to perform these updates. This proactive approach helps prevent compatibility issues, security vulnerabilities, and performance-related problems, ultimately contributing to a stable and visually consistent website.
- Backup Before Updates: Before initiating updates, create a backup of your website. While updates are generally designed to enhance functionality, unforeseen issues may arise. Having a recent backup ensures that you can quickly revert to a stable version if any complications occur during the update process.
Periodic Image Audits
- Review Image Quality: Conduct periodic audits of your website’s images to ensure they maintain the desired quality and clarity. Check images across different sections of your site, paying attention to featured images, thumbnails, and any image galleries. Address any blurry or distorted images promptly to maintain a polished visual presentation.
- Optimize Older Content: Over time, as your site evolves, some older content may not align with the current standards for image quality and dimensions. Periodically review and optimize images in older posts and pages. This can involve resizing images, updating compression settings, and ensuring compatibility with the latest theme specifications.
- Utilize Image Optimization Tools: Leverage image optimization tools or plugins to automate the process of maintaining image quality. These tools can compress images without compromising quality and help ensure that your media library remains optimized over time.
By consistently following these prevention tips, you create a resilient foundation for your WordPress website. Regular updates and image audits not only prevent potential issues but also contribute to a seamless and visually appealing user experience.
Frequently Asked Questions For Fixing Blurry Images In WordPress
Q1: Why are my WordPress images appearing blurry?
A: Blurry images in WordPress can result from various factors, including incorrect image dimensions, excessive image compression, and compatibility issues with themes or plugins. Identifying and addressing these issues through proper optimization can improve image clarity.
Q2: How can I determine the recommended image sizes for my WordPress theme?
A: Consult your theme’s documentation or settings to find recommended image sizes for different sections (e.g., featured images, thumbnails). Additionally, themes often provide guidelines for optimal image dimensions, ensuring a crisp and visually appealing display.
Q3: What is image compression, and how does it impact image quality?
A: Image compression is the process of reducing file sizes without compromising visual quality significantly. While compression is essential for faster loading times, excessive compression can lead to blurry images. Striking a balance by choosing appropriate compression settings is crucial.
Q4: Are there tools to inspect and analyze image properties in WordPress?
A: Yes, there are various image inspection tools and plugins available for WordPress. These tools provide detailed information about image properties, helping you identify issues like resolution, format, and compression levels. Consider using online tools or dedicated WordPress plugins for image inspection.
Q5: What is lazy loading, and how can it improve image loading times?
A: Lazy loading is a technique that defers the loading of images until they are about to be displayed. This helps improve page load times by prioritizing the loading of visible content. Enabling lazy loading in WordPress can be done through browser support or using plugins that provide additional customization options.
Q6: How do Content Delivery Networks (CDNs) enhance image delivery?
A: CDNs distribute website content, including images, across multiple servers globally. By serving images from servers geographically closer to users, CDNs reduce latency and improve loading times. Integrating a CDN with your WordPress site can significantly enhance the delivery of static content.
Q7: Why is it important to regularly update WordPress themes and plugins?
A: Regular updates to themes and plugins often include bug fixes, security patches, and improvements in compatibility. Updating ensures that your site remains secure, performs optimally, and stays compatible with the latest WordPress versions, reducing the risk of issues like blurry images.
Q8: How can I automate the maintenance of image quality in WordPress?
A: Utilize image optimization plugins that offer automation features. These plugins can handle tasks such as compression, lazy loading, and bulk optimization. Additionally, consider implementing tools that provide scheduled image audits to maintain consistent image quality.
Q9: Can I optimize images in older posts on my WordPress site?
A: Yes, it’s recommended to periodically review and optimize images in older posts. Update images to align with current standards, resize them if necessary, and ensure they meet the specifications of your current theme. This helps maintain a cohesive and visually appealing website.
Q10: What role does image quality play in user experience on a WordPress site?
A: Image quality directly impacts user experience by influencing the visual appeal and professionalism of your website. Clear and well-optimized images contribute to a positive impression, better engagement, and improved SEO performance, enhancing the overall user experience.
Conclusion
As you conclude your journey in resolving and preventing blurry image issues on your WordPress website, it’s essential to recap the solutions implemented and emphasize the ongoing commitment to maintaining image quality. The following points summarize the key takeaways and actions for a visually stunning and optimized WordPress site.
Recap of Solutions
- Adjusting Image Dimensions:
- Understand the recommended image sizes for different sections of your theme.
- Resize images before uploading to align with theme specifications.
- Optimizing Compression:
- Experiment with compression settings to balance file size and image quality.
- Explore and implement image compression plugins for more control.
- Theme and Plugin Optimization:
- Ensure compatibility between your theme and plugins.
- Regularly update themes and plugins to prevent conflicts and security risks.
- Implementing Lazy Loading:
- Enable lazy loading to improve page load times.
- Fine-tune settings for optimal performance and user experience.
- Using Content Delivery Networks (CDNs):
- Choose a reputable CDN provider and integrate it with your WordPress site.
- Optimize CDN settings to enhance the delivery of static content, including images.
- Regularly Update Themes and Plugins:
- Stay informed about updates for your WordPress theme and plugins.
- Schedule routine updates and perform backups before making changes.
- Periodic Image Audits:
- Review and maintain image quality across different sections of your website.
- Optimize older content by updating images to meet current standards.
Maintaining Image Quality in WordPress
- Commit to Ongoing Maintenance:
- View image quality as an ongoing aspect of website maintenance.
- Regularly check for updates, and promptly address any issues that arise.
- Utilize Automation Tools:
- Explore tools and plugins that automate image optimization and maintenance.
- Leverage features that streamline the process of keeping your media library optimized.
- Prioritize User Experience:
- Understand that image quality directly influences user experience and site credibility.
- Keep the end-user in mind when making decisions about image dimensions and compression.
In conclusion, the journey to maintain optimal image quality in WordPress involves a combination of proactive measures, ongoing vigilance, and the strategic implementation of advanced techniques. By consistently applying these solutions and remaining dedicated to the upkeep of your website, you ensure that your WordPress site continues to captivate and engage visitors with visually striking and high-quality images.